Whether you are an experienced Microsoft Project user or new to the software, you may or may not be aware of the default 8-hour working day and the ability to edit this.
Although many projects have resources working for only 8 hours each day there are instances where this is not the case.
Within many industries it is common that schedules are created on a 24-hour basis. In order to ensure projects are completed on time, many organisations which undertake activities such as manufacturing and production organise their resources in a way which ensures 24-hour work schedules.
An example of this would be a factory operating for 24 hours each day which requires flexible production schedule planning.
A project with a 24-hour schedule is one which has resources working for 24-hours every working day rather than the default 8 hours.
In order to plan a project with a schedule such as this using Microsoft Project you will need to know how to change the default working calendar.
If you are a production planner, project manager or anyone else looking to schedule 24-hour work, the following steps will help you set up a 24-hour calendar within Microsoft Project.
I have used the example of a manufacturing project hoping to reduce its production timeline to explain these steps fully.
An Example
First of all, I have created the project, assigning each task with its relevant resource from the resource sheet.
As you can see, the duration of the project is 15 days, equating to a total of 120 hours of work.
Each task is only being worked on for 8 hours each day, totalling 40 hours of work being completed for each task every week.
So, what is happening for the other 16 hours of the day?
Absolutely nothing!
To speed up the project it is often possible to allow all tasks to be worked on for 24 hours each day rather than the default 8-hour day.
Increasing the number of working hours in each day allows the duration of the project to decrease as more work can be completed in a shorter amount of time.
To do this, we need each of the resources to be working for 24 hours each day rather than the 8-hour Microsoft Project default.
To do this, we have to make a few changes.
First of all, we need to change the default calendar each of the resources is working to, from ‘Standard’ calendar to ’24 Hours’.
We do this by viewing the ‘Resource Sheet’ and selecting ’24 Hours’ under the heading Base for each of the individual resources – as shown below:
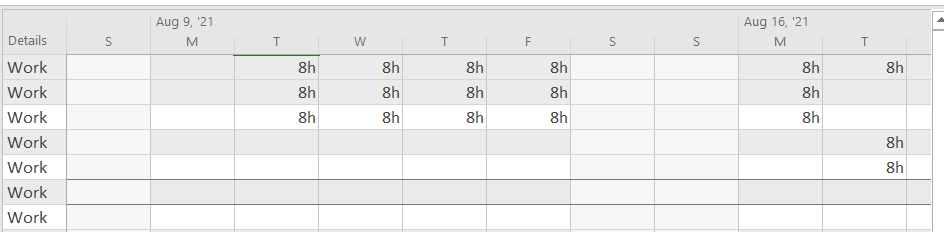
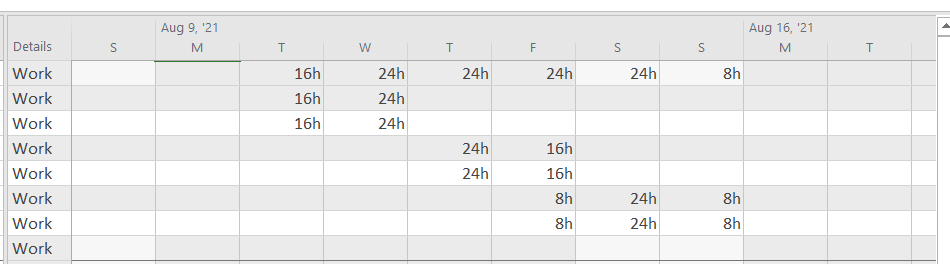
Doing so allows the number of hours being worked by each of the resources to increase. These change can be seen within the ‘Task Usage’ view, changing from 8hrs of work being performed each day to 24hrs – as shown below.
(Before Calendar Change)
(After Calendar Change)
By changing to a 24-hour calendar we reduce the number of days required to complete the project however the number of hours worked remains the same. This is due to more work being able to be complete each day, increasing from 8 hours to 24 hours of continual work.
Each task still requires the same amount of work however the resources are able to spend 24 hours each day working on the tasks rather than the original 8 hours.
The image above illustrates the task usage, showing that the project is able to be worked upon for 24 hours each day rather than 8 hours.
So, although the number of worked hours remains the same, the total duration of the project is reduced from 15 days to 5 as a result of more work happening each day.
Rather than the project taking 15 days to complete, with each task duration being 5 days, the 24-hour calendar has allowed 120 hours of work to be completed within 5 days, with each task taking 1.67 days to complete.
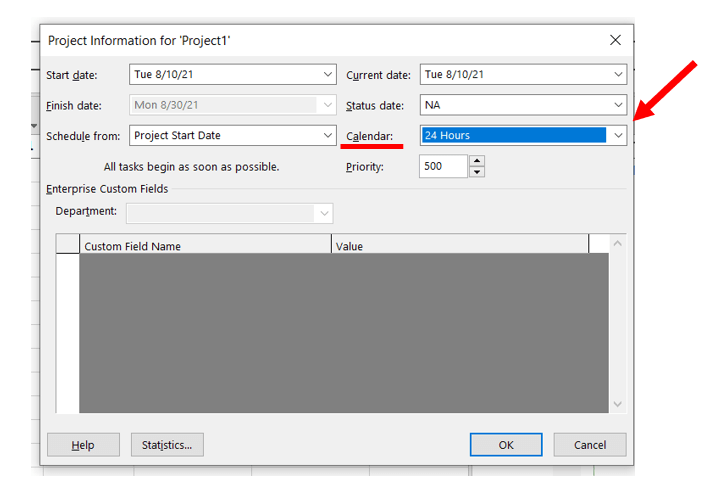
The next step is to then edit the calendar the project is based upon, changing from the ‘Standard’ to the ’24 Hours’ calendar. We do this by selecting Project > Project Information and selecting ’24 Hours’ from the drop down menu.
Make sure you select ‘OK’ to save your changes!
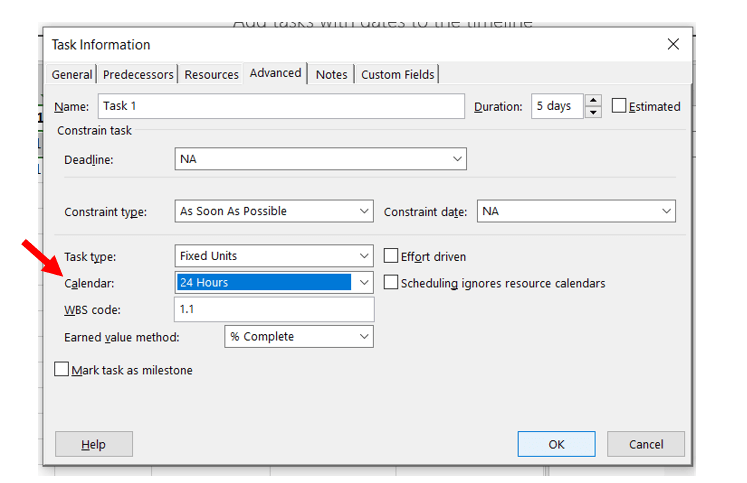
In order to ensure all of the tasks are definitely working to the correct calendar, we must then change the calendars of all of the individual tasks. Doing this is important as it ensures all tasks are being planned in alignment with the project calendar.
To do this, double click on each of the tasks and select the ’24 Hours’ calendar from the pop-up window, as shown below. Repeat this action for all of the tasks, making sure to select ‘OK’ after each to save the changes.
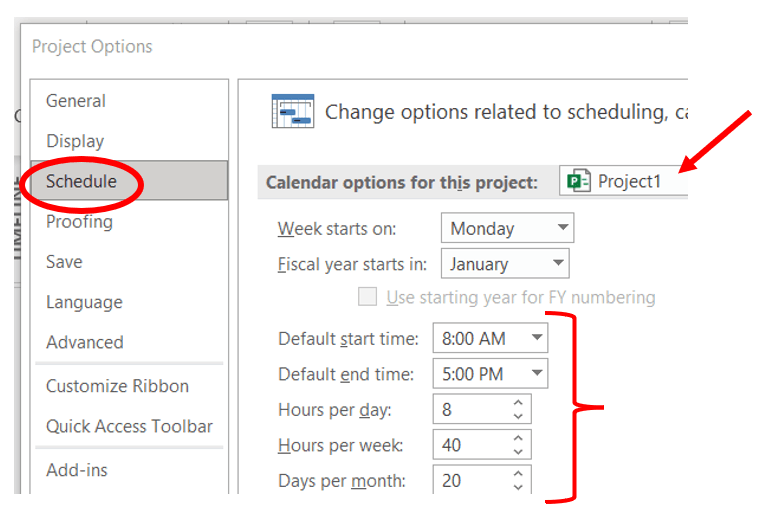
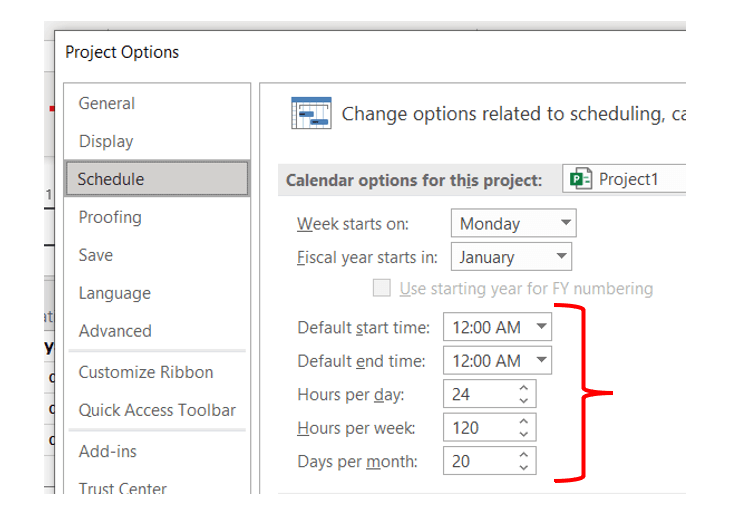
The reason we must go to the effort of changing all of these settings is because Microsoft Project provides a default calendar which assumes each day will have only 8 hours of work. To view the default settings we can select ‘File’ at the top left hand side of the screen to expose a menu of possible actions. We then must select ‘Options’ at the very bottom of the menu, as outlined below:
Once the ‘Project Options’ window has appeared, select ‘Schedule’ on the left hand side – this will expose a number of change options relating to the project’s calendars and scheduling.
What we are interested in is the ‘Calendar options for this project: Project 1’ section which shows the project’s default working information, seen below:
These settings are the reason our resources will by-default only work for 8 hours each day therefore it is important to know how they can be by-passed to allow for a 24 hour calendar.
In order to edit the ‘default’ project calendar, we can simply input our desired working hours within the relevant Schedule options for the project, as shown below.
Doing this allows Microsoft Project to be working in sync with the project being scheduled, ensuring no mistakes are made when using the ‘Auto-Schedule’ function. Read more about auto scheduling vs. manual scheduling in Project!
Conclusion
Project managers are often looking for ways to reduce the duration of a project and the use of 24-hour calendars to ensure more work is completed each day is one of the most popular methods.
Making sure the project calendar and task calendars are both set to 24-hours is essential to a successfully planned project using Project. It is also crucial that the Project default calendar is set to 24-hour work days to avoid scheduling mistakes.
By using the steps provided above, I am confident you will be able to effectively manage 24-hour workdays within your projects by changing your project’s calendar to 24-hours from the application’s default 8-hour work day.
Hi, I’m Adrian, a Senior Project Manager and the Creator of Tactical Project Manager, where I teach a pragmatic approach to project management. Led large-scale IT and business projects for over 10 years. My goal is to enable you to lead any project with confidence.
Shaped by feedback from 40+ technical managers who plan projects every day.
Finally, get a handle on team capacity planning!
Many of you have told me: “I have NO GOOD WAY to manage resource allocation” I could not let that sit. So, I locked myself into my basement for 6 months to build the SIMPLEST Resource Planner out there. It gives you instant visibility on workload and team availability.