As a project manager I bet you have found yourself in situations where you have faced delays which affect All Resources and therefore have a cost.
An example of this could be within a construction project where the whole project team have found themselves waiting for 5 hours on the arrival of a cement mixer. During these 5 hours no work is able to be undertaken therefore there is 0 productivity!
Even though no work is being undertaken during this time, there is still going to be a cost…
As a project manager, you will continue to charge the project client for the hours unworked as the delay was a fault of theirs and the project team still need to be paid.
If this sounds familiar to you and you’d like to know how to calculate the cost of the delays, you are in the right place!
Calculating the cost faced by your project by delays like this is important as it allows you to know exactly how much extra money they are charging the customer.
Within this article, I will show you how this can be done within Microsoft Project using examples so you are able to overcome this issue within real-life scenarios.
How to show the cost of a delay in Project
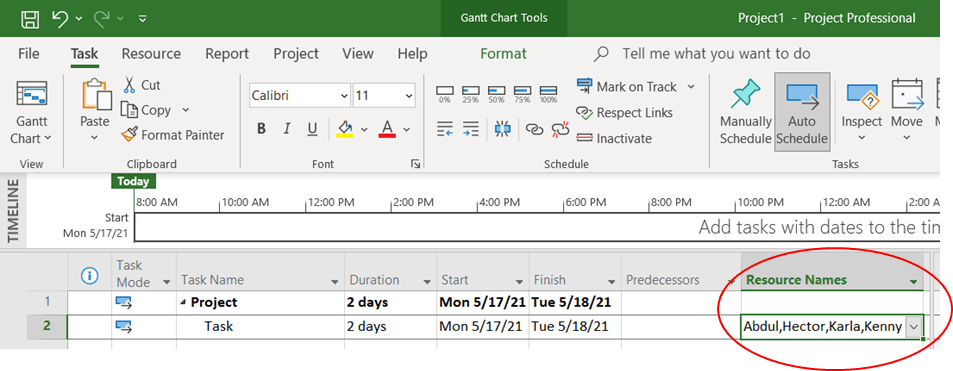
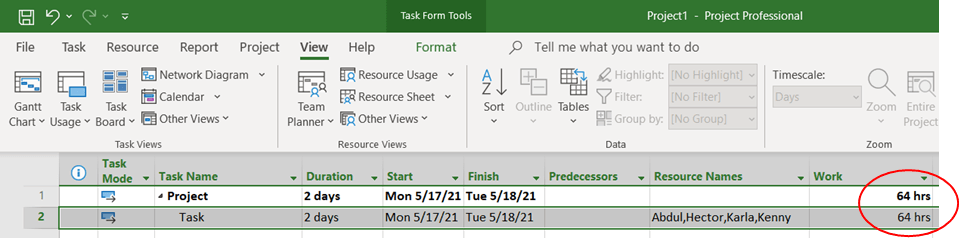
In order to show you how to do this, I have created a simple project within MS Project which will have a two-day duration and four resources, all of which have an eight-hour workday and are assigned to the singular task.
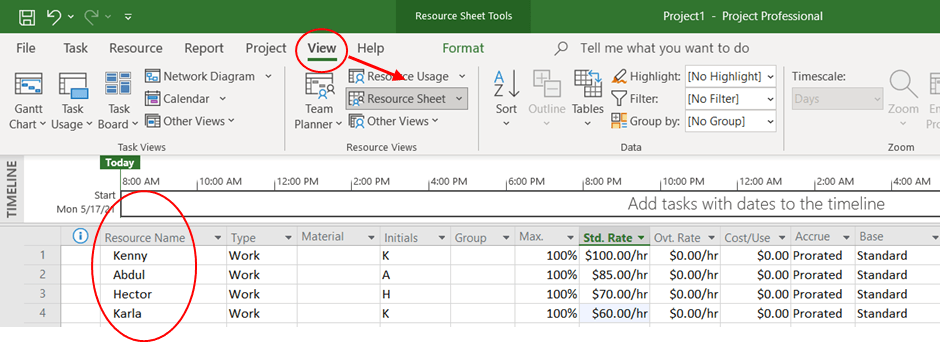
To assign resources, select View > Resource Sheet then enter your resources within the table as I have done below, remembering to assign a standard hourly rate of pay to each.
It is then necessary to assign the resources to the task. To do so, I have selected all of the resources from the menu which appears from the drop-down arrow within the Resource Names column, as shown:
Before the next phase of the project can begin and these resources can continue working, the cement mixer must arrive. Before the mixer arrives, the resources are unable to undertake any work.
So… if the mixer is late, the task will also start late as a consequence.
This can be solved very simply however so there is no need to panic!
Ensuring MS Project is aware of this delay can be done by either moving the task or entering a ‘Start no Earlier than’ constraint.
If using the ‘Start no Earlier than’ constraint option, we would enter the date and time which the cement mixer is due to the delivered. Therefore, five hours later than originally planned.
Using this constraint to delay work does not, on its own, charge the client for the waiting time, which is the most important thing!
So how do we charge for this waiting time? I’ll show you…
To remind you, within this example the waiting time is 5 hours.
Option 1
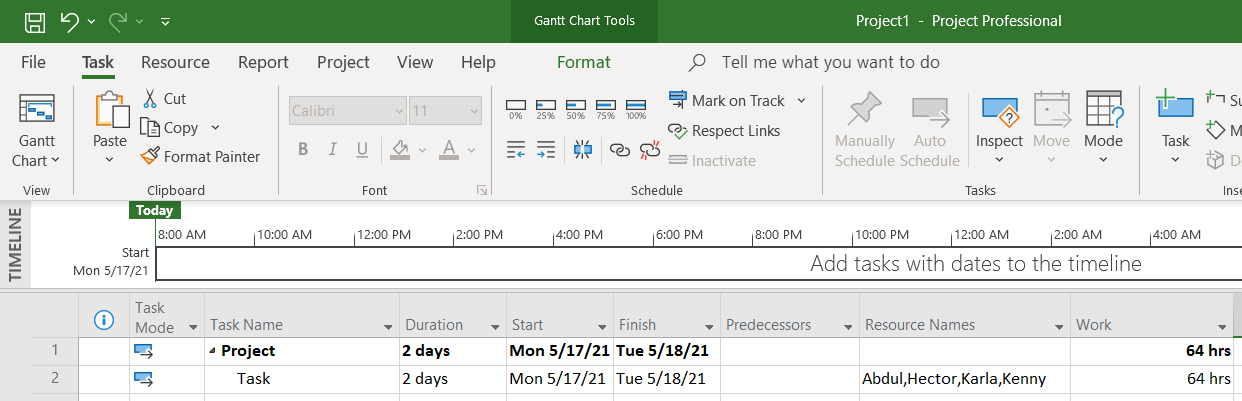
The first option we have is to add 5 hours of extra work to each resource which totals to 20 hours of extra work.
This is what the work looked like previously:
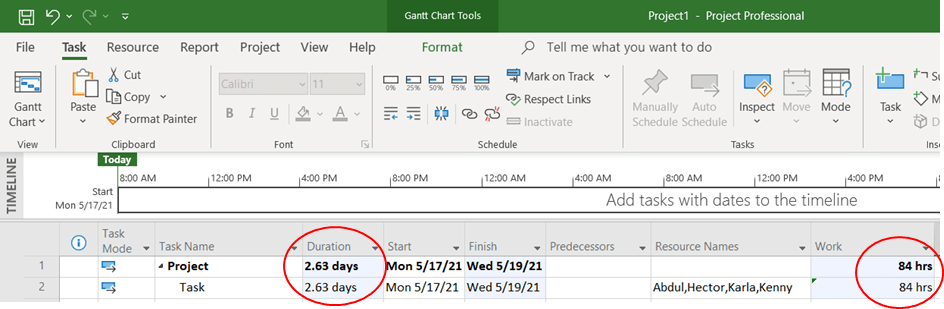
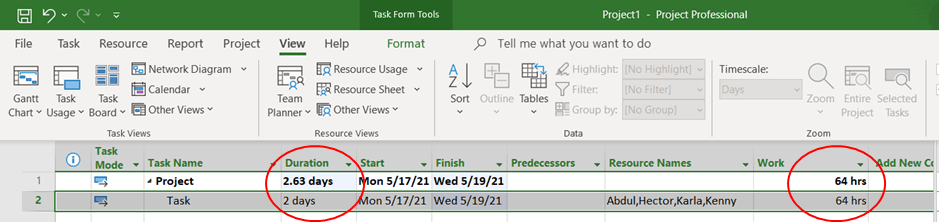
And this is what the work looks like now, when I add the extra 20 hours to the total, taking the duration of work from 64 hours to 84 hours.
Because we increased the number of hours worked, the total project duration has increased from the original 2 days to 2.63 days.
This increase in days is due to the fact all four of the resources have had to wait for 5 hours each, therefore an extra 20 hours’ worth of payment is due to cover the cost of this delay.
This is the easiest, clearest way this delay charge can be accomplished within MS Project as it takes very little time and is easy to understand therefore price discrepancies can be avoided between the project manager and the client.
If you ever find yourself in the situation where the client is arguing whether they should pay for the time with 0 productivity, they definitely should! Because, believe it or not, the waiting is actually work. Even though nothing was accomplished during this time, your resources still need to be paid for the time they have waited.
Option 2
The second option would be useful if, for example, your client knew that the cement mixer would be late and warned you of this delay in advance, offering to pay for it.
Within a scenario like this, the delay is not a shock to the resources and they will therefore not have to waste time waiting on the arrival of the cement mixer. Instead, the project manager will know their resources have four hours of ‘free time’ which can be assigned elsewhere.
The original project, before entering delays, will look like this:
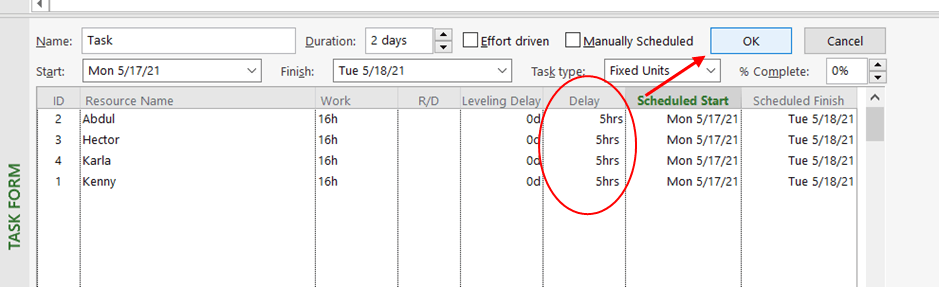
In this case, all you will need to do is delay your task for 5 hours per resource. We do this by selected View, selecting Details and entering the delay as 5 hrs within the table before clicking OK.
By delaying the task for 5 hours per resource to account for the cement mixer delay, the duration of the project increases to 2.63 days yet the number of Work hours remains the same.
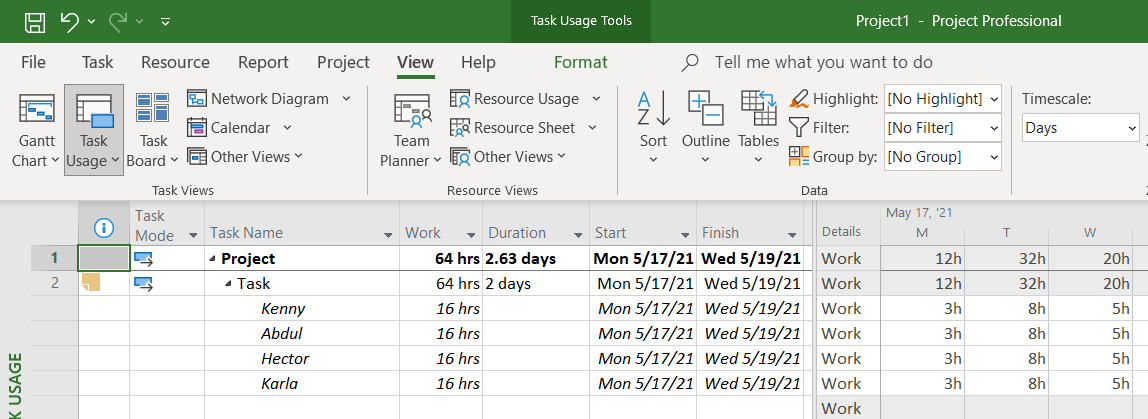
Within the Task Usage View, we can see this:
As a result of this foreseen delay, the working time of the resources is able to be managed effectively, with each of them working for only 16 hours.
Instead of each waiting for 5 hours, the resources instead work for only 3 hours each on Monday 17th. The remainder of the work is then able to be undertaken on Tuesday, with the final 20hrs, which otherwise would have been wasted waiting, being delayed until Wednesday.
The overall duration of the project has therefore been increased but the number of working hours has been managed in a way which means they remain the same as originally planned.
As the total hours are unchanged, MS Project does not automatically know to charge the client for the delay.
We, therefore, must calculate the waiting time ourselves… easy! Let me show you how.
This amount can be determined by the following calculations:
Kenny – 5 hours @ $100 per hour = $500
Abdul – 5 hours @ $85 per hour = $425
Hector – 5 hours @ $70 per hour = $350
Karla – 5 hours @ $60 per hour = $300
Total to be charged to the project client = $1,575
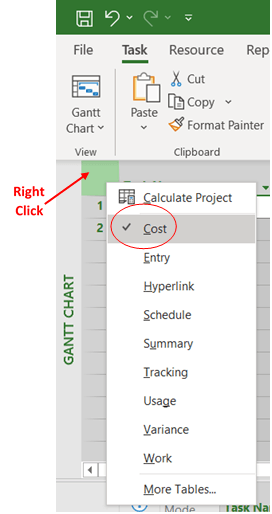
We can view the cost breakdown of the project by selecting the Cost table after right-clicking on the top left-hand side corner box of the Gantt chart, as shown within the screenshot below:
As we have calculated the waiting time, we can enter this into the Fixed Cost column within the Task row.
By doing so, we are able to calculate the project’s Total cost.
Kenny – 16 hours @ $100 per hour = $1,600
Abdul – 16 hours @ $85 per hour = $1,360
Hector – 16 hours @ $70 per hour = $1,120
Karla – 16 hours @ $60 per hour = $960
Fixed cost = $1,575
TOTAL charge to project client = $6,615
It’s that simple!
As you will know, being able to calculate the total cost of a project is essential however there may be times where the client questions where costs are coming from.
To avoid a scenario like this, it is important that the origin of all costs are clear!
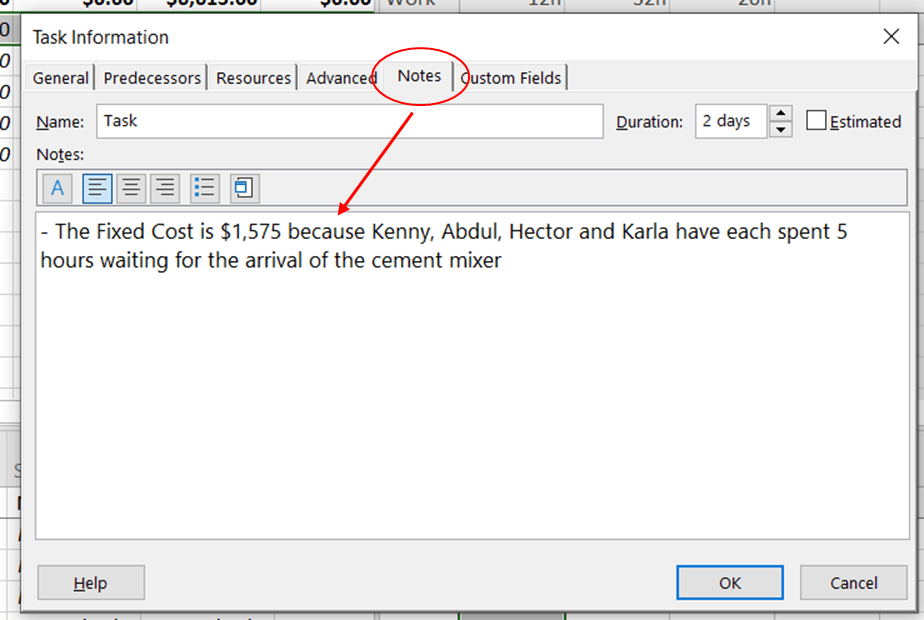
A little tip I can give you to avoid having your costs questioned is to always add a note with a comment that explains the fixed costs within the Task Information.
This can be done by double-clicking the Task row, selecting Notes and adding your note in the box provided like so:
By leaving a little comment like this, the client will be fully aware of where the costs have come from. This clarity avoids uncertainty and unnecessary questioning by the client so can be a real time saver!
I hope this step-by-step example allows you to calculate the costs of any delays within your projects using MS Project. Remember, this article is simple but the basis can be applied to project’s of any size with any number of resources.
Sara is currently studying towards her Masters in Project Management at Robert Gordon University in Scotland, where she graduated from with a BA(Hons) Management degree. Sara is passionate about equality and would like to see more women in project management positions, even dedicating her undergraduate thesis to researching the barriers faced by females in attaining the role. In her free time Sara can be found walking her dog in the countryside or competing in half marathons, hoping to one day complete a full one.
Shaped by feedback from 40+ technical managers who plan projects every day.
Finally, get a handle on team capacity planning!
Many of you have told me: “I have NO GOOD WAY to manage resource allocation” I could not let that sit. So, I locked myself into my basement for 6 months to build the SIMPLEST Resource Planner out there. It gives you instant visibility on workload and team availability.